MyBatisy源码-概述
背景
mybatis在国内是是java-web开发里非常重要的框架,通过xml配置的mappr对数据库进行了orm映射,降低程序对数据库访问的开发难度。
希望通过阅读mybatis源码可以了解orm框架都有哪些角色,每个角色的边界是什么
角色
配置
作用:加载配置文件活着注解。
关键类:Configuration:该对象加载了配置里的数据源、mappr的映射即“MappedStatement”,并且缓存到内存中
会话
数据绑定
作用:

关键类:MappedStatement
执行器
作用:

关键类:Executor
处理器
作用:

关键类:
- StatementHandler
- ParamenterHandler
- ResultSetHandler
状态机
最近刷题lc8写一个string–>int的函数,结题思路是用限自动机的方案
- 穷举有几种数字状态“ ”,”+/-“,”0-9”,”其他字符”,对应的 start、signin_number、end
- 穷举每种状态之间转化关系
- 遇到每种字符后,处理每种状态的逻辑
源码如下:
1 | public class Solution { |
应用场景
当我们的系统复杂度到一定程度的时候,对象的状态分支会很多,我们可以选择用if,else来解决,但是最后往往会写出一堆几乎无法维护的屎山。那么我们可以将对象抽象成一个个状态,特殊情况实际上就是状态之间的转换。
比如上题,就是有限的状态之间的转换。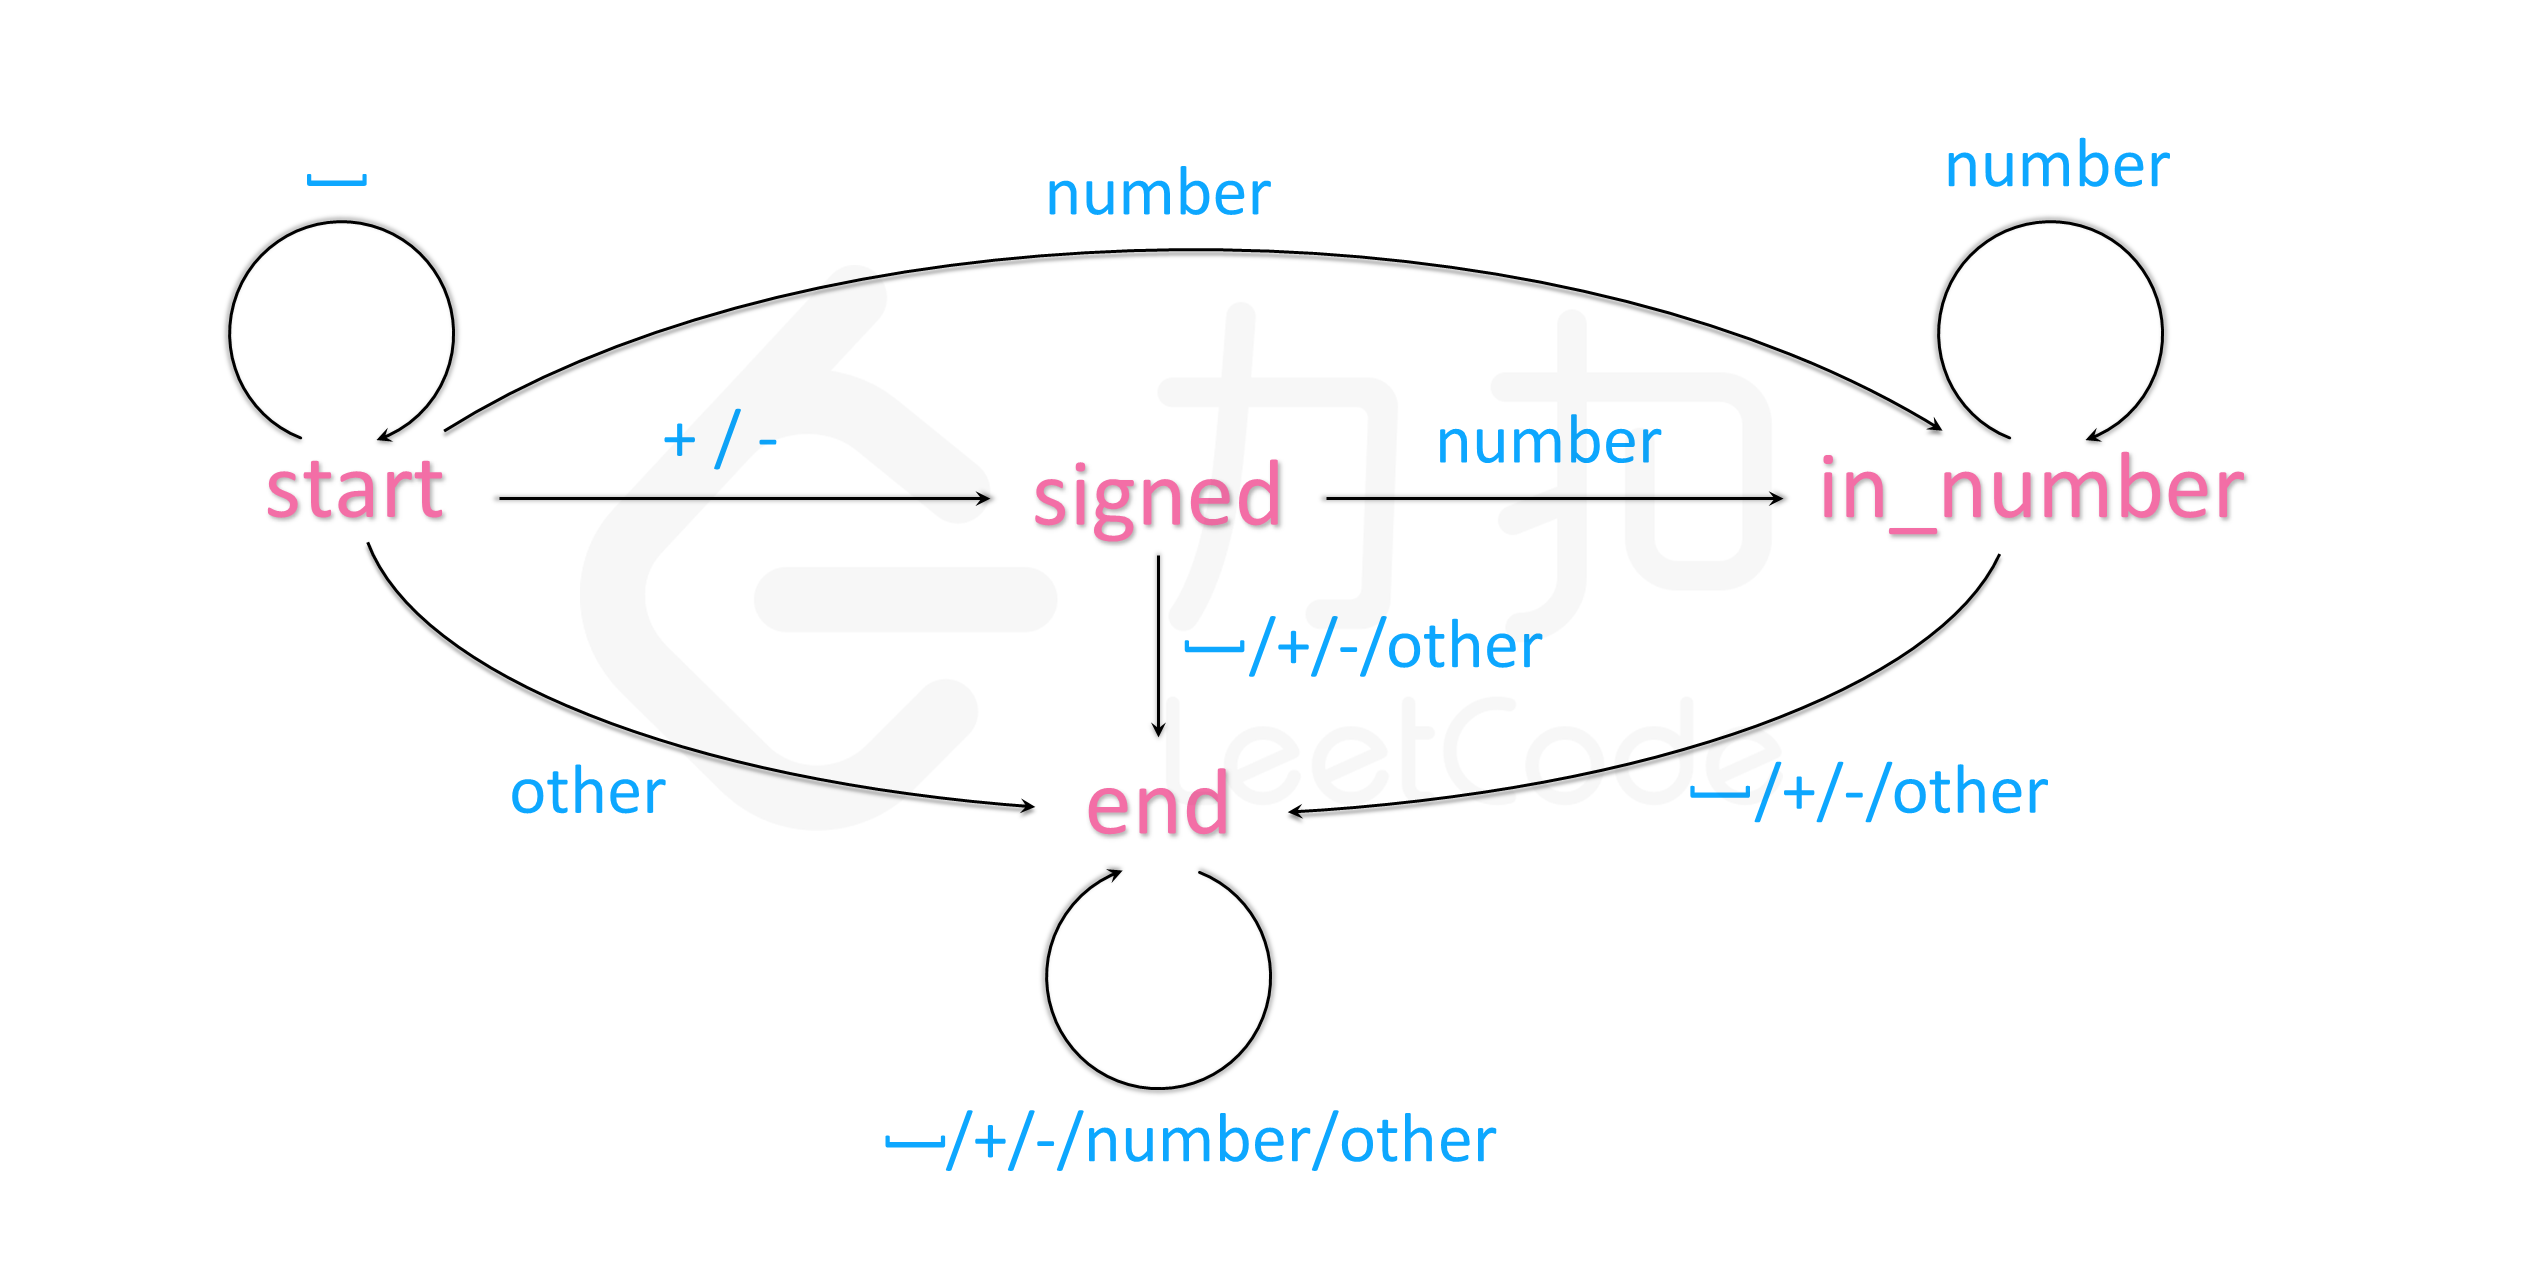
ebpf学习-初探ebpf
ebpf是什么
Linux内核一直是实现监视/可观察性,网络和安全性的理想场所。不幸的是,这通常是不切实际的,因为它需要更改内核源代码或加载内核模块,并导致彼此堆叠的抽象层。 eBPF是一项革命性的技术,可以在Linux内核中运行沙盒程序,而无需更改内核源代码或加载内核模块。通过使Linux内核可编程,基础架构软件可以利用现有的层,从而使它们更加智能和功能丰富,而无需继续为系统增加额外的复杂性层。
eBPF导致了网络,安全性,应用程序配置/跟踪和性能故障排除等领域的新一代工具的开发,这些工具不再依赖现有的内核功能,而是在不影响执行效率或安全性的情况下主动重新编程运行时行为。
如果直接解释eBPF,有点不明所以。那我们就看看有哪些基于eBPF的工程,这些工程或许你已经知道,或是已经经常使用,也许你会明白eBPF距离我们并不遥远。
基于eBPF的项目
bcc
BCC是用于创建基于eBPF的高效内核跟踪和操作程序的工具包,其中包括一些有用的命令行工具和示例。 BCC简化了用C进行内核检测的eBPF程序的编写,包括LLVM的包装器以及Python和Lua的前端。它还提供了用于直接集成到应用程序中的高级库。bpftrace
bpftrace是Linux eBPF的高级跟踪语言。它的语言受awk和C以及DTrace和SystemTap等以前的跟踪程序的启发。 bpftrace使用LLVM作为后端将脚本编译为eBPF字节码,并利用BCC作为与Linux eBPF子系统以及现有Linux跟踪功能和连接点进行交互的库。Cilium
Cilium是一个开源项目,提供基于eBPF的联网,安全性和可观察性。它是从头开始专门设计的,旨在将eBPF的优势带入Kubernetes的世界,并满足容器工作负载的新可伸缩性,安全性和可见性要求。Falco
Falco是一种行为活动监视器,旨在检测应用程序中的异常活动。 Falco在eBPF的帮助下审核Linux内核层的系统。它使用其他输入流(例如容器运行时度量标准和Kubernetes度量标准)丰富了收集的数据,并允许连续监视和检测容器,应用程序,主机和网络活动。Katran
Katran是一个C ++库和eBPF程序,用于构建高性能的第4层负载平衡转发平面。 Katran利用Linux内核中的XDP基础结构来提供用于快速数据包处理的内核功能。它的性能与NIC接收队列的数量成线性比例,并且使用RSS友好的封装转发到L7负载平衡器。Sysdig
Sysdig是提供深层系统可见性的简单工具,并具有对容器的原生支持。
其他基于eBPF技术的项目还有很多,比如kubectl-trace ,ply 等,这里不再赘述。
一个简单的DEMO
下面我们写一个简单的demo来展示下开发一个ebpf程序需要哪些步骤,这里我们采用Cilium/ebpf库进行开发,因为ebpf的用户态代码可以用golang开发。:P
程序是通过ebpf的tracepoint监听syscalls/sys_enter_execve,在执行该方法时候获取pid和commd。通过ebpf的map将pid和commd传到用户态。
step.1 环境搭建
系统配置: Ubuntu 20.04.4
系统依赖: llvm,clang-10.0.0-4ubuntu1,还有linux的kernel这里源码在路径(/kernel-src),golang环境
step.2 编写ebpf的kernel侧的程序-c代码
- 编写代码并且用下面命令将代码变成bpf_program.o
clang -O2 -target bpf -c bpf_program.c -I/kernel-src/tools/testing/selftests/bpf -o bpf_program.o - 将bpf_program.o文件copy到golang程序下
源码:
1 |
|
step3用户态侧代码-golang的代码
- 编写go代码
- 执行go build ./
- 执行go程序,这里是go-tools
1 | var mapKey uint32 = 0 |
程序入口
1 | func main() { |
step3,运行查看效果
- 在终端1上运行:./go-tools
- 在中断2上输入任何指令
- 查看终端1的输出
1 | 2022/03/11 17:01:26 reading map: lookup: key does not exist |
golang源码学习-sync.Map
sync.Map
位于sync包中,主要解决map的线程安全的问题,适用于读多写少的场景。
sync.Map的原理
内部持有俩个map,一个是read,类型是atomic.Value实际类型是【map[interface{}]entry】,一个是dirty类型是map【[interface{}]entry】。
其中read主要解决无数据竞争的情况下数据的快速访问,它通过cas进行快速的读写操作;一旦出现数据的竞争,就会用到dirty,dirty里面保存read里所有非nil的值【通过状态来表示unexpunged】,当出现竞争后数据会写到dirty而不是read中。
数据的访问路径大致是:
- 读,先从read里找,read里没有,去dirty里找,如果miss过一定的阈值【dirty的长度】时候,将dirty和read交换,交换后dirty置为nil;
写,先判断key是否存在,如果存在且不为expunaged,先通过cas写快速返回,否则有如下分支:
- 如果key是expunaged,说明key之前被删除了,但是dirty没有,unexpunaged之后同步修改read和dirty
- 如果key不存在于read,但是存在于dirty修改dirty
- 如果key不存在与read和dirty,初始化dirty【如果需要】,数据写入dirty
因为数据在并发写的时候一旦发生竞争还是会用到锁,并发写的时候的锁是不可避免的。所以sync.Map适用于读多写少数据冲突不那么复杂的场景
sync.Map的源码分析
结构体分析
1 | type Map struct { |
Store
1 | func (m *Map) Store(key, value interface{}) { |
Load
1 | func (m *Map) Load(key interface{}) (value interface{}, ok bool) { |
Delete
1 | func (m *Map) Delete(key interface{}) { |
ThreadLocal如何在子线程传递
主线程如何向自己创建的子线程传递ThreadLocal值,只需要创建InheritableThreadLocal值,实现原理如下:
InheritableThreadLocal覆写了它三个方法:
1 | public class InheritableThreadLocal<T> extends ThreadLocal<T> { |
见子线程初始化过程,初始化时候如果当前线程inheritableThreadLocals不为空
1 | private void init(ThreadGroup g, Runnable target, String name, |
那么inheritableThreadLocals它什么时候不为空呢,见下面:
1 | //在set值时候判断ThreadLocalMap为空,调用InheritableThreadLocal.getMap方法返回当前线程的t.inheritableThreadLocals,否则初始化t.inheritableThreadLocals |
坑-下载文件,丢失文件格式和后缀
原因
将记录导出成excel供下载,生成xlsl以后下载文件会丢失文件格式,curl链接情况如下
1 |
|
解决方案
上传时候指定filename时候xxxxx.xlsx
在curl发现代码已经变为如下所示,问题解决
1 | < Content-Disposition: inline; filename="xxxxx.xlsx" |
SSL的请求过程
名词解释
公钥即证书:由服务端传递给客户端,用于客户端的CA证书校验合法性;非对称加密clientKey;
CA证书:内置于系统中用于校验公钥的合法性
私钥:服务端保存,用于非对称解密clientKey
clientKey:公钥验证通过后由浏览器生成clientKey通过对称加密和服务端进行交互
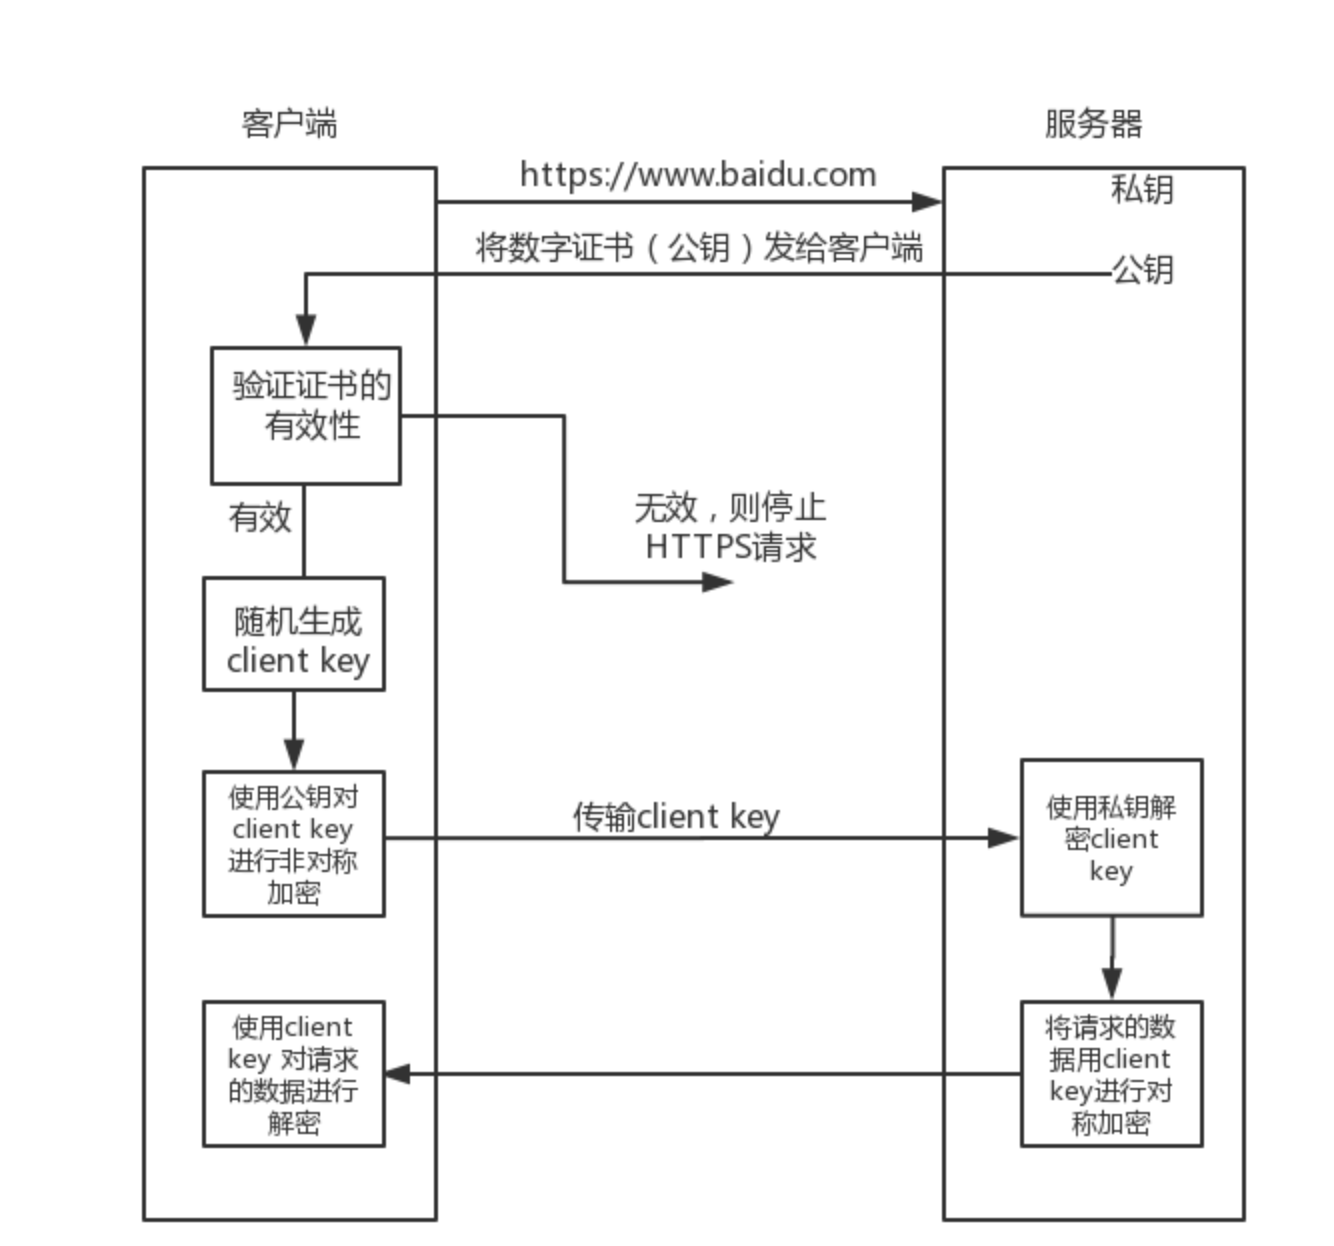
发送请求的过程
- 浏览器发送请求给服务端,这时候端口是443;
- 服务端返回公钥【证书】给客户端;
- 浏览器通过系统内置的CA证书验证证书的合法性,如果不合法请求终止;
- 浏览器生成clientKey明文,并且用公钥加密clientKey,发送密文的clientKey给服务端;
- 服务端得到加密过的公钥,用私钥解密,获取明文clientKey;
- 浏览器用clientKey通过对称加密方式通信:
- 浏览器通过clientKey加密请求,发送给服务端;
- 服务端通过clientKey解密请求,并且将响应用clientKey加密发给浏览器;
- 浏览器接到密文响应,用clientKey解密;
图解
如何保证缓存和数据库的数据一致
本篇文章主要讨论常见的集中缓存的使用方案,以及如何解决数据和缓存的一致性
常见的缓存模式
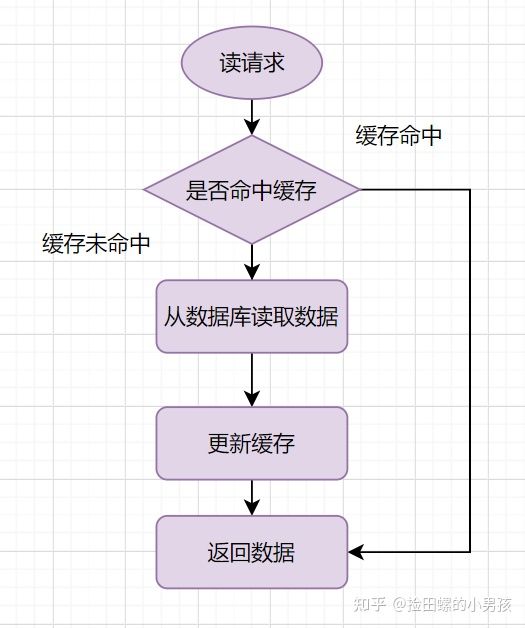
Cache-Aside Pattern
我们常见的缓存方案,可以说我们大部分都采用这种方案,见下面:
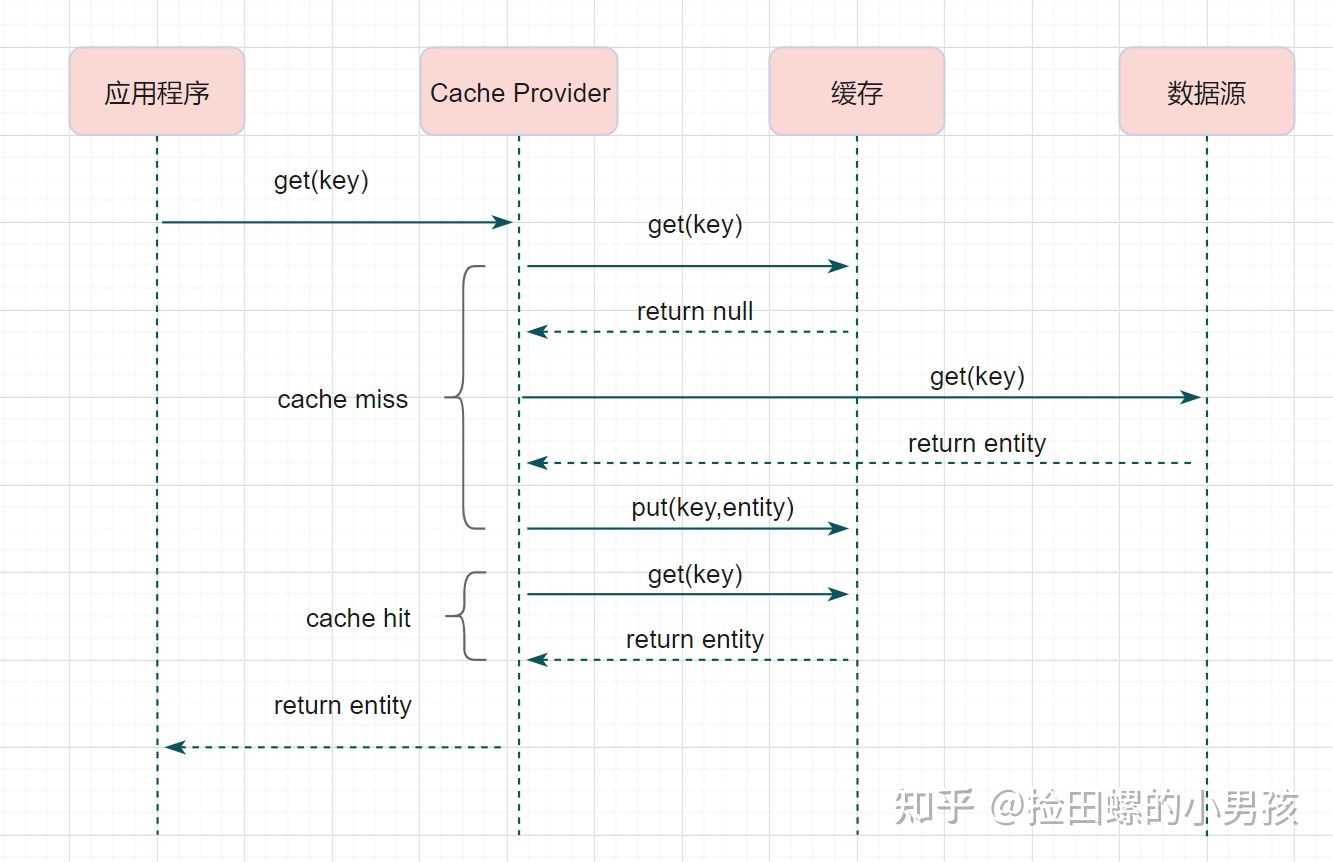
Read-Through/Write through(读写穿透)
本质上和Cache-Aside Pattern类似,只是在程序和缓存中增加了一层Cache Provider,读写如果未命中由Cache Proxy来负责和缓存交互。减少程序开发的复杂性,需要中间件支持
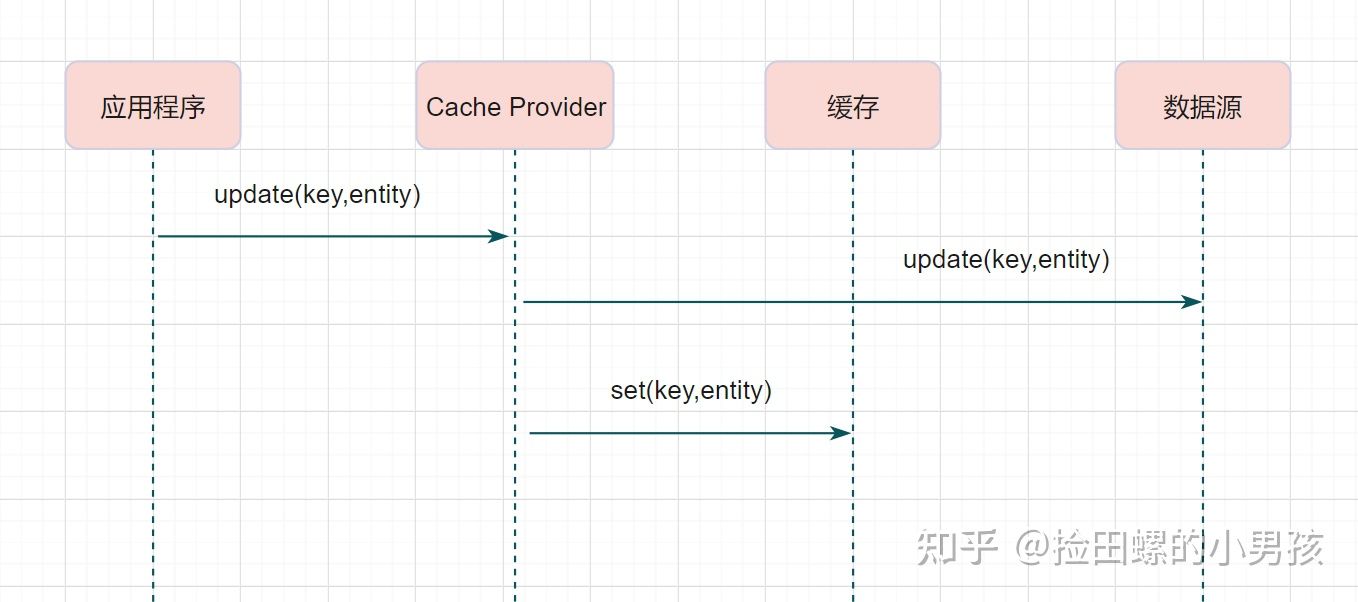
Read-Through
Write through
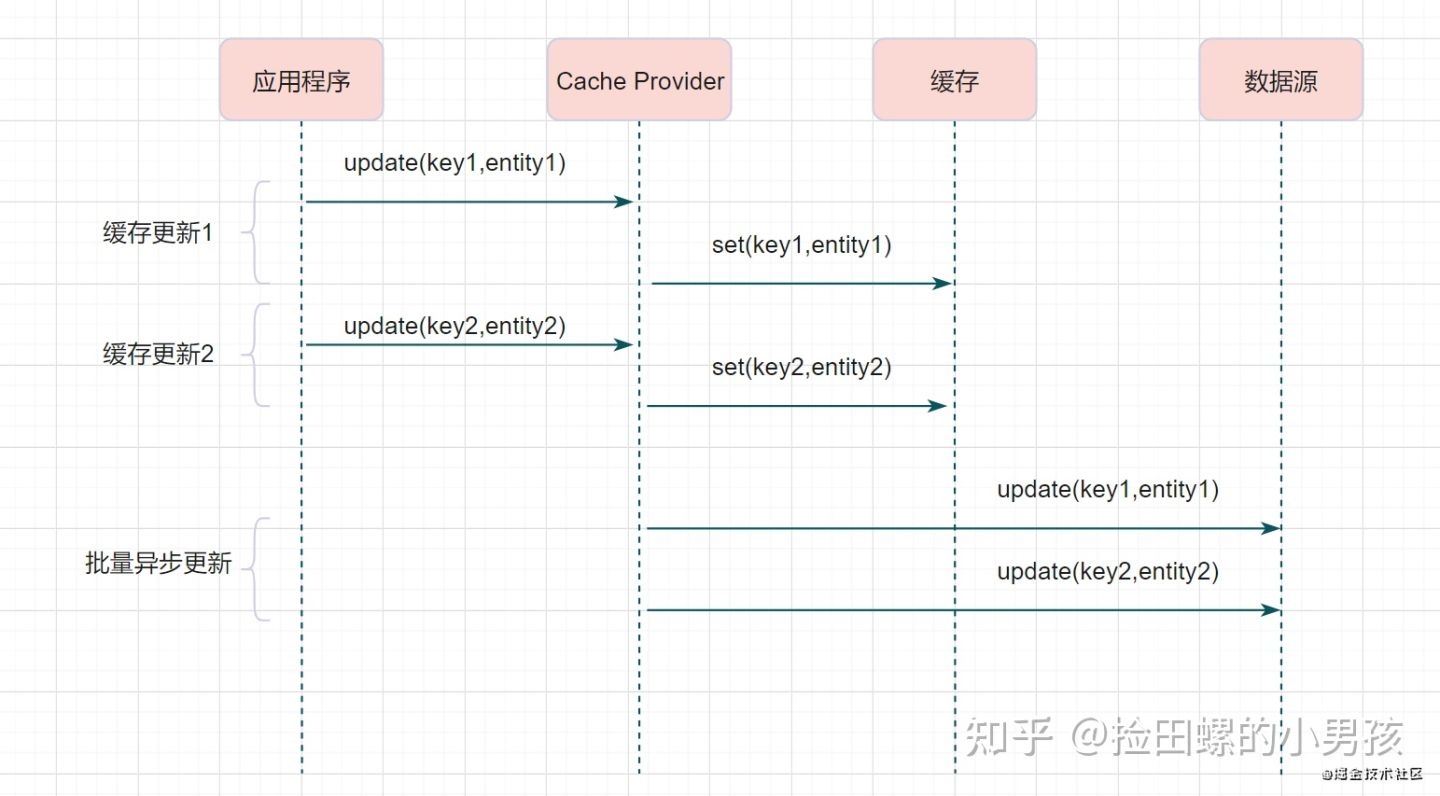
Write behind
和Read-Through/Write through类似,区别是Write behind模式下,数据都是写到Cache Provider,由Cache Provider异步的刷到数据库中,听着是不是很熟悉,对Mysql的WAL异步刷盘就是这种模式
如何保证缓存和数据库的数据一致
这里是以常见的Cache-Aside Pattern来讨论,正确操作缓存的姿势是
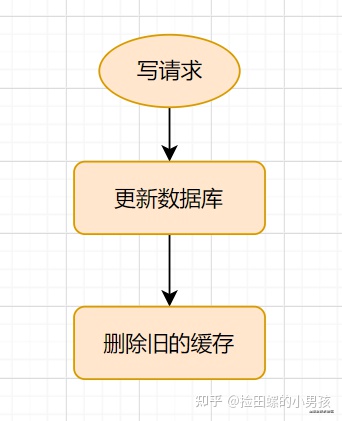
这里要注意俩点
不是更新缓存而是要删除缓存
如果更新缓存不是删除缓存在并发场景下会出现脏数据里有如下:

- 线程A先发起一个写操作,第一步先更新数据库
- 线程B再发起一个写操作,第二步更新了数据库
- 由于网络等原因,线程B先更新了缓存
- 线程A更新缓存。
这时DB是B操作后的数据,缓存是A操作的数据
要先操作数据库而不是先操作缓存
如果先操作缓存不是先操作数据库会在并发场景下会出现脏数据里有如下:
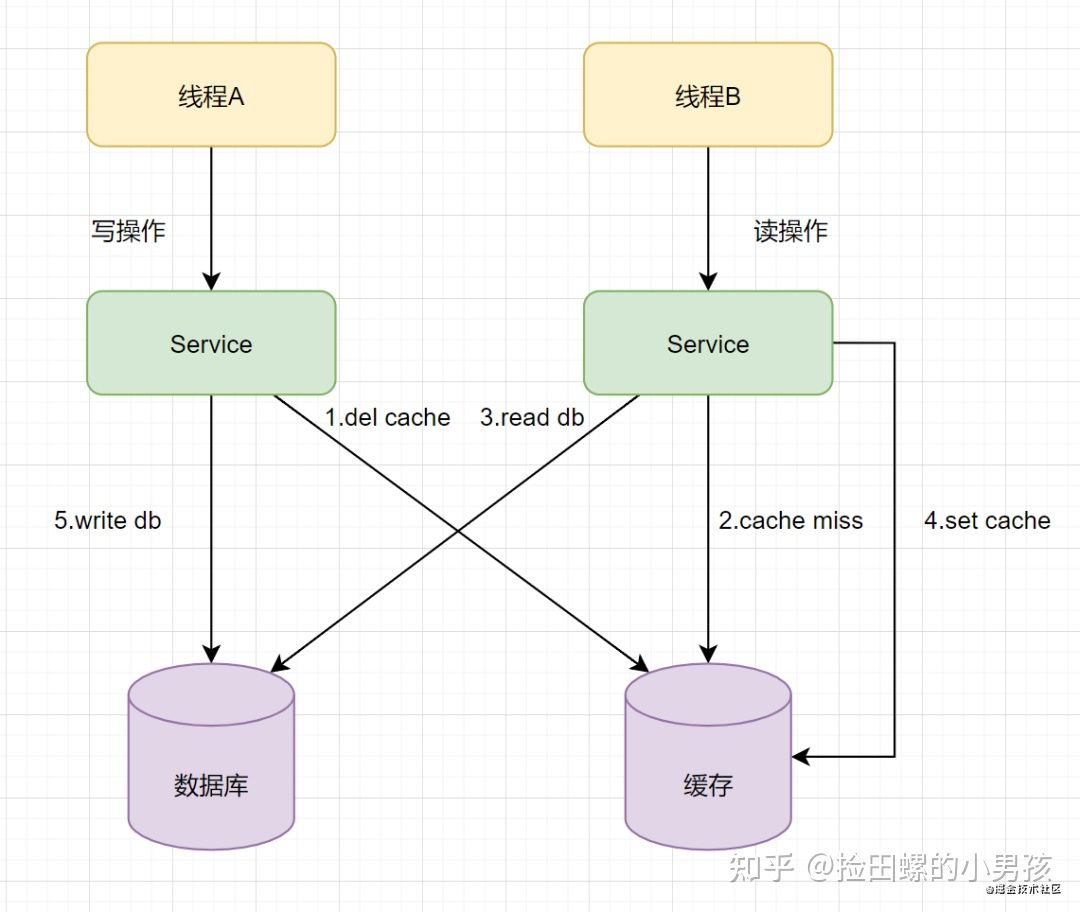
- 线程A发起一个写操作,第一步del cache
- 此时线程B发起一个读操作,cache miss
- 线程B继续读DB,读出来一个老数据
- 然后线程B把老数据设置入cache
- 线程A写入DB最新的数据
这时DB是A操作后的数据,缓存是B操作后的数据。